Showing posts with label DIY. Show all posts

Sunday, December 6, 2015

DIY: Play Kitchen from Entertainment Center

So I know I don't blog anymore, but I just had to show off this play kitchen I created from an old entertainment center. I could not be more excited to give this to Brody for Christmas!


After searching for a couple weeks, I came across this entertainment center on Craigslist... for free! Yay freebies! A huge thank you to my daycare lady's husband for giving me a hand carrying this beast out of a basement and for the use of his truck and trailer to transport. 


When I got this early November, I only had 3 evenings and 2 full weekends (without Brody) to work on it before Christmas, so needless to say, every waking moment during that time was spent out in the freezing cold garage. 


My favorite part of this whole project, as it was for my DIY Busy Box, was rummaging through the Restore here in Holland. I spent about 4 hours digging through bins and putting a lot of thought into how everything could come together. Luckily, I found about 90% of the things I needed in that one trip. The rest, I either had on hand, found on Craigslist, or purchased from the Dollar Store. This entire project was created for less than $30.


I used the two bottom cupboards as the oven and microwave. A simple piano hinge helped me convert the one door to open from the bottom. The microwave buttons were originally a cheapie calculator, but the rubber started to yellow and some idiot glued them on upside down... twice. Damnit, Andrea. So I simply printed out some buttons on a clear label instead. Not as much fun, but... 


Instead of using a stainless steel bowl, I purchased a clear plastic punch bowl and spray painted the underside of it. The logic behind that was less noise because, well, boys are noisy. The faucet was another Craiglist freebie. The "backsplash" is actually the reverse side of laminate wood flooring planks. I thought it was a cool texture and a lot less heavy than using real tiles that were also available at Restore. 

Because there were two huge holes in the back of that main board (for cords), I opted to build a shelf that brought out that back backsplash 4-5". Solved a tiny problem and added a bit of dimension.


The stove is my favorite piece. They're actual small burners and knobs from a real stove. I used the backside of a small cupboard door as a base to boast them up a little.


I removed the wooden shelves behind the glass door and replaced them with closet organizer shelving that I had leftover from my bedroom. Thought it made it look a little more realistic and anything that lightened this beast up a bit was definitely a plus. The knob was also replaced with a towel bar to look more like a refrigerator handle. 

The window was created from a 16x20 frame with a bit of quarter round for the cross bars. And yes, that's an actual photo of our backyard. Thought Brody would like seeing his own swingset and yard. The grey, white, yellow (on the outside walls), blue, and black paint were all from old household projects from either my house or my parents.  


Anyways, excuse the messy garage in the background. I have to wait a couple weeks before Mama and Papa Z can come over and lend a hand getting this into Brody's playroom. But overall, I'm so stoked with how this turned out. I kinda don't want to let Brody play with it because I know the paint will chip and things will be destroyed, and it just looks so purdy right now, but oh well. 

I coordinated with Santa this year, so he'll be getting all the fake food, pots and pans, utensils, etc. on Christmas morning. I even found an awesome play blender, mixer and toaster at Menards. Hope he likes it!

UPDATE: Check out photos of the final project with all Brody's play dishes, food, and small appliances in place, HERE! 

Sunday, December 22, 2013

DIY: Freebie Dresser Turned Entertainment Center

I've been on the lookout for the ideal TV stand for quite awhile. I needed it to be sturdy against little baby hands and hide/secure all my movies and super old Nintendo and Playstation games so Lil Man didn't throw 'em around the basement. Of course, Pinterest spoke to me and told me to scour Craigslist for a cool DIY idea. 

I found this dresser on Craigslist for free. Woot! However, the previous owner left it out in a ditch on the side of the road for a couple days. So on my lunch break, I ran out to the middle of nowhere and lifted this beast into the back of my Durango by myself. Got it home and carried it down the basement steps... by myself. Yeah, this damn free dresser was going to give me a hernia, no doubt. 


Other than the couple bucks I spent on some quarter round, this project was entirely free. I used the leftover white and grey paint from Brody's nursery, reused the original hardware (just added some silver spray paint) and the quarter round was used to clean up a rough edge. 

The top two drawers were removed to accommodate my DVD and VCR (yes, I still have one of those.) I'm still looking for a basket that'll fit in that space to hold the remotes and whatnot, but in the meantime... 


I was very glad that some ammonia and lots of scrubbing did wonders for this dresser. It was in rough shape and because it was laminate, sanding wasn't an option. The original owner also left the bottom two drawers filled with family photos. When I contacted him in order to give them back, he told me to throw them out. Omg. As a picture hoarder, I felt I was committing some sort of crime! Gah. 

Overall, I'm super excited about how this turned out! 


Sunday, December 15, 2013

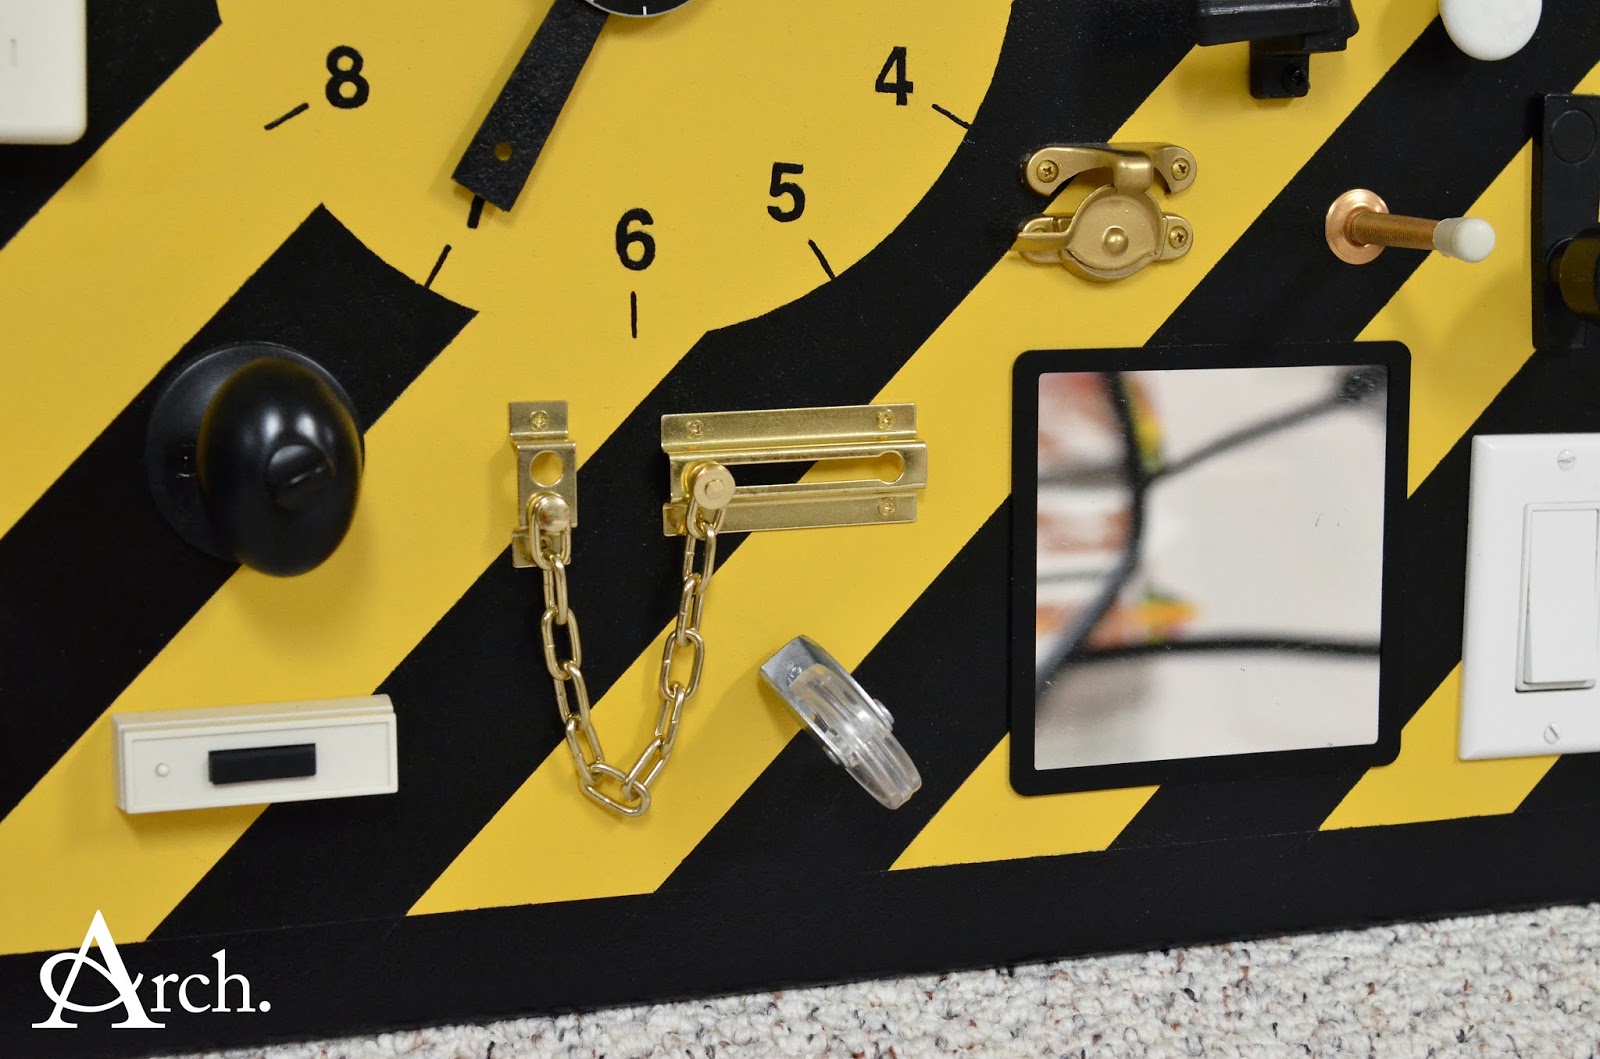
DIY: Busy Box for Boys

I've known since this summer that for Brody's first birthday, I wanted to make him something. Thanks to Pinterest, there are an abundance of DIY ideas out there... so I just had to pick one. Since a lot of the projects I came across weren't quite age appropriate, I decided on a DIY busy box for boys. 


I loved this project start to finish. I found most of the components at several West Michigan Restores. It was like a treasure hunt digging through all the bins finding just the right things that clicked, spun, opened, dinged, boinged and latched... I loved it. 


A huge thank you to Papa Z for all his help getting the board prepped. We opted to go with pressboard to cut down on splinters and used a handheld router to round all the edges for safety purposes. 


Three slits were cut down each end so that velcro scraps can be used to secure the board to a piece of furniture or other sturdy object. This beast weighed quite a bit when it was all said and done, so I would highly recommend taking some sort of action to stabilize it rather than just lean it against a wall. 


Painting was a ton of fun. I opted for traditional caution tape colors and stripes. 


A lot of the pre-used gadgets had some wear and tear, so most of them were spray painted to give 'em a fresh look. I used gold, silver, black and white spray paint to keep everything looking cohesive.


We used extra pressboard to create two 6"x6" doors... one opening to the side and the other opening at the top. I created little picture sleeves out of black binding covers and a transparency. 


Mama Z came up with the great idea to include a functioning doorbell. :)


I found this stove knob and arrow that somehow had to be included. So thankfully I came up with the clock BEFORE I started painting. I left a large enough circle to encompass the entire arrow and painted on the numbers using a toothpick. 


Friday, December 6, 2013

12 Days of DIY Ornaments: Christmas Card Ornament Ball

To kick off the Christmas season, I've teamed up with Tawny and ten other wonderful ladies to give you the 12 Days of DIY Ornaments. Today's my day and I'm dusting off an oldie. Be sure to swing by these other blogs and see what they've put together! 


December 1st: Tawny's Tid Bits
December 3rd: Simply {Darr}ling
December 4th: My So Called Chaos
December 5th: Madtown Macs
December 6th: Andrea Arch
December 7th: Always & Forever
December 9th: My Better Half and Me
December 10th: Sparkling with Sneakers
December 11th: Life with Amberly & Joe
December 12th: My Three Bittles


These fun paper ornaments can be made out of old Christmas/greeting cards or regular cardstock. You will need the following supplies:

1", 1.5" or 2" hole punch
Old greeting cards or cardstock
Xacto knife or scoring tool
Fish line/yarn/string/ribbon
Glue
Triangle template (download here)


You will need 20 circles (all the same size). Have fun mixing colors and patterns!


Cut out the appropriate triangle template and trace it on every circle. Use a scoring tool of the tip of an xacto knife to gently score all three sides. Fold the flaps inward.


Your top and bottom pieces will be created using 5 circles each. Fill in the middle section with the remaining 10 circles. 


At some point, don't forget to tape one end of the string onto the inside.


Ta da! Thanks for swinging by and be sure to check out the rest of the ornament tutorials from the other ladies. :)

Sunday, October 13, 2013

Practical Bathroom Cleaning + Organizing Tips

My family and I don't live in a Pinterest-esque house with hidden playrooms behind armoires, waterfall shower heads installed in the ceiling next to the tub built around a fireplace or a lawn that Better Homes and Gardens would drool over. We live in a modest house... with a modest bathroom... with toothpaste spit on the mirror, a dog who clogs the drain after every bath and a billion bath toys for a kid who only plays with two of them.

I'd like to think of this as reality for most of us. I try to keep our modest little bathroom functional and organized the best I can, but let's face it... people have a lot of stuff. With that said, let me take you on a little journey around my bathroom and show you how I keep it clean and organized.

Bathtub/Shower

1. My shower unit used to be disgusting. Turns out you don't need expensive cleaners to cut through all the grime build up. Spray down you tub/shower with distilled white vinegar, wait a few minutes, then scrub using a stiff brush and baking soda. My shower looks just like new.

andreaarch_bathroom1

2. In between heavy duty cleanings, give your tub a light scrub with a 50/50 mixture of distilled white vinegar and Dawn dish soap stored inside the handle of a scrub brush. Just a quick scrub a couple times a week while you're in the shower eliminates the need to do a power clean more than a couple times a year.

3. Use a 3M heavy duty hook to hang your shower caddy on the opposite side of the shower away from the faucet to keep things dry and out of the way.

andreaarch_bathroom3

4. Fabric shower curtain liners are machine washable -- clean and eco-friendly!

andreaarch_bathroom9

5. If you have little ones, then you probably have way too many bathtub toys! A curtain rod, some plastic shower hooks and cheap crates from the dollar store keep toys off the floor and allows them to completely drip dry. We hung ours at the top of the shower unit and as long as we keep the baskets to the very front and back, we have no problem hitting them with our elbows.

andreaarch_bathroom7

6. Pump bottles from the dollar store can free up a hand when giving babies/kids a bath. The larger sizes can also often store double the liquid in order to cut down on inventory.

andreaarch_bathroom13


Cupboards/Drawers

7. Utilize desk organizers for makeup and other smaller toiletries!

andreaarch_bathroom2

8. Don't forget about the dollar store and all their organizing products! Lazy susans, shoe boxes and baskets keep your space clutter free and organized. We also use separate baskets for children and adult medication in our medicine drawer to avoid any confusion.

andreaarch_bathroom8

andreaarch_bathroom10

9. Plastic crates can especially be a lifesaver for the vertically challenged with tall cupboards. By grouping soaps, lotions and other alike items in crates, they can be pulled down together and not shoved to the back of the shelf.

andreaarch_bathroom6

10. Utilize old magazine racks to store blow dryers, flat/curling irons, etc.

andreaarch_bathroom5

11. You know that magnetic paper clip thing you never use at work? It works wonders for bobby pins!

andreaarch_bathroom4


Misc.

12. Keep a bottle of all-purpose cleaner, a rag, window cleaner and paper towels in the bathroom at all times. A spare second to wipe down the countertop or mirror could save you time on cleaning day.

andreaarch_bathroom11

13. If your family never knows where anything is (or you just compulsively move stuff around all the time), labels are your friend.

andreaarch_bathroom12

Go forth. Kick off your Fall cleaning with a super tidy bathroom!
Pin It button on image hover